
Updated on 2026-03-25 / iPhone Tips
A stuck restore screen can turn a simple iPhone update into a stressful moment. Instead of restarting normally, your device shows the restore icon and refuses to move forward. It might seem serious, but it’s usually a fixable glitch caused by software errors or interrupted updates.
You don’t need to panic or rush to a repair shop. With a few simple steps, you can fix an iPhone stuck in restore mode within minutes.
Part 1: Why Is My iPhone Stuck in Restore Mode? (Main Causes)
Your iphone stuck in restore mode and won't restore usually because something went wrong during an update or restore. Here are the simple reasons:
- The iPhone didn’t finish installing the latest iOS update.
- The cable was unplugged or the computer shut down during restore.
- Using an outdated version causes errors while restoring.
- The phone turned off during the update or restore process.
- A small system glitch can force the phone into restore mode.
- A broken button or loose connection can trigger restore mode.
- Modifying system files sometimes puts the phone into restore mode automatically.
Part 2: How to Get iPhone Out of Restore Mode for Free
After updating, if your iPhone is stuck in restore mode or won't restore at all, don't freak out. There are a few simple, cost-free methods to restore it to normal. Below, we'll go over the most basic free solutions.
Method 1: Force Restart iPhone
The quickest way to fix an iPhone that is stuck in restore mode is to force a restart. The system is refreshed, and minor software bugs that prevent your phone from booting up regularly are fixed.
Follow the steps to fix iphone stuck in restore mode after update:
iPhone 8, X, 11, 12, 13, 14, 15, 16 or newer
Quickly press and release the Volume Up button, then do the same with Volume Down. Next, press and hold the Side (Power) button until you see the Apple logo.
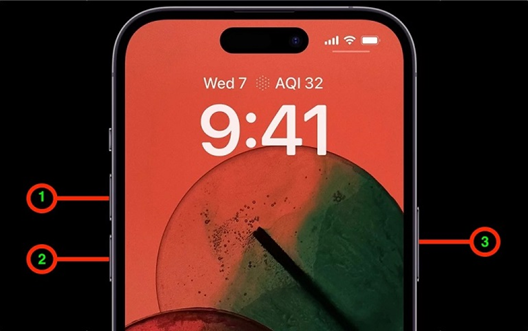
iPhone 7 or 7 Plus
Press and hold both the Volume Down and Power buttons together. Let go when the Apple logo appears.
iPhone 6s or earlier
Hold down the Home button and the Power button at the same time. Release them when you see the Apple logo.
Method 2: Charge iPhone with Original USB Cable
Sometimes, your iPhone stays stuck in restore mode simply because it’s running out of power or the charging cable isn’t working properly. Using an original Apple USB cable and charger can make a big difference.
Connect your iPhone to a power source using the original Lightning cable, and let it charge for at least 30 minutes. This helps stabilize the system and allows the phone to exit restore mode safely.
Method 3: Update iTunes or Finder
When your iPhone is stuck in restore mode and won’t restore, the issue might be with your computer. An old version of iTunes or Finder can cause problems. It may stop your iPhone from connecting or restoring properly. Updating iTunes or Finder fixes these errors and helps your computer talk to your iPhone.
Step 1: Open iTunes on your PC. Go to the menu bar at the top and select Help > Check for Updates.
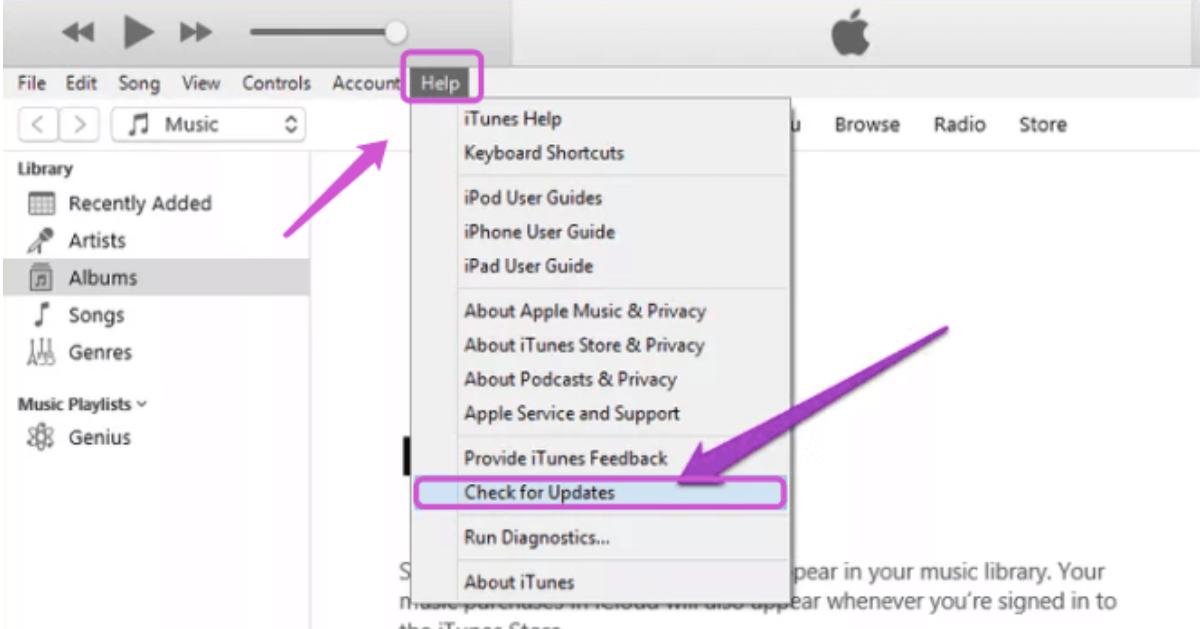
Step 2: If an update is available, install it immediately and restart your computer.
Step 3: If you don’t see this option, iTunes might be installed from the Microsoft Store in that case, open the Microsoft Store, click Library, and then tap Get Updates to update it automatically.
Part 3: How to Fix iPhone Stuck in Restore Mode (Safe & Fast Methods)
Method 1: Fix iPhone Stuck in Restore Mode Loop Using a Repair Tool (Recommended)
An iPhone stuck in restore mode can be annoying, especially when iTunes or Finder fails to fix it. In such cases, using a professional iOS repair tool works best. Tenorshare ReiBoot is one of the most trusted tools for this job. It’s made to repair iOS system issues safely and doesn’t require any technical skills.
Unlike iTunes, ReiBoot can fix recovery mode problems without deleting your data. Many users prefer it because it repairs common system glitches, update failures, and stuck screens in just one click.
Main Features of Tenorshare ReiBoot
- One-Click Recovery Mode: Enter or exit iPhone recovery mode instantly and for free.
- Fix Over 150 iOS Issues: Solves boot loops, black screens, frozen screens, and more.
- No Data Loss: Standard Repair keeps your data safe while fixing system errors.
- Deep Repair Mode: Handles serious issues that basic repair can’t fix (may erase data).
- Factory Reset Option: Restore your iPhone without Apple ID or password.
Steps to Fix iphone stuck in restore mode loop Mode Using ReiBoot
- Step 1: Download and Install ReiBoot
Download and install Tenorshare ReiBoot on your computer. Connect your iPhone with a USB cable and open the program. Click Start Repair to continue.
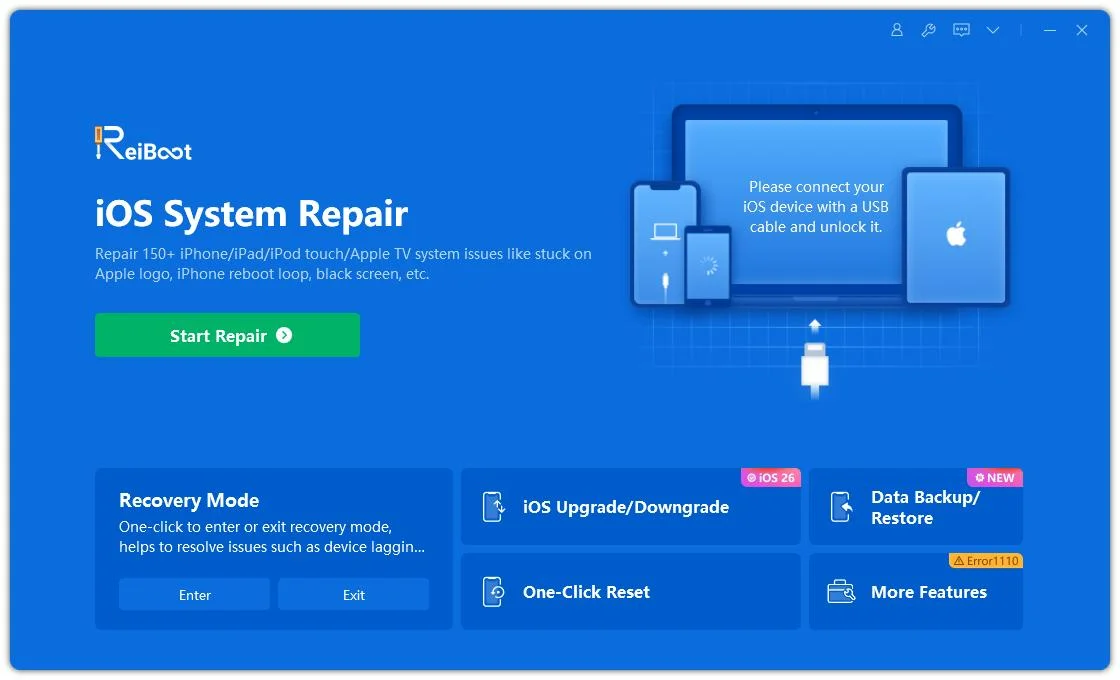
- Step 2: Start the Repair Process
Choose Standard Repair to fix normal system issues without losing data.
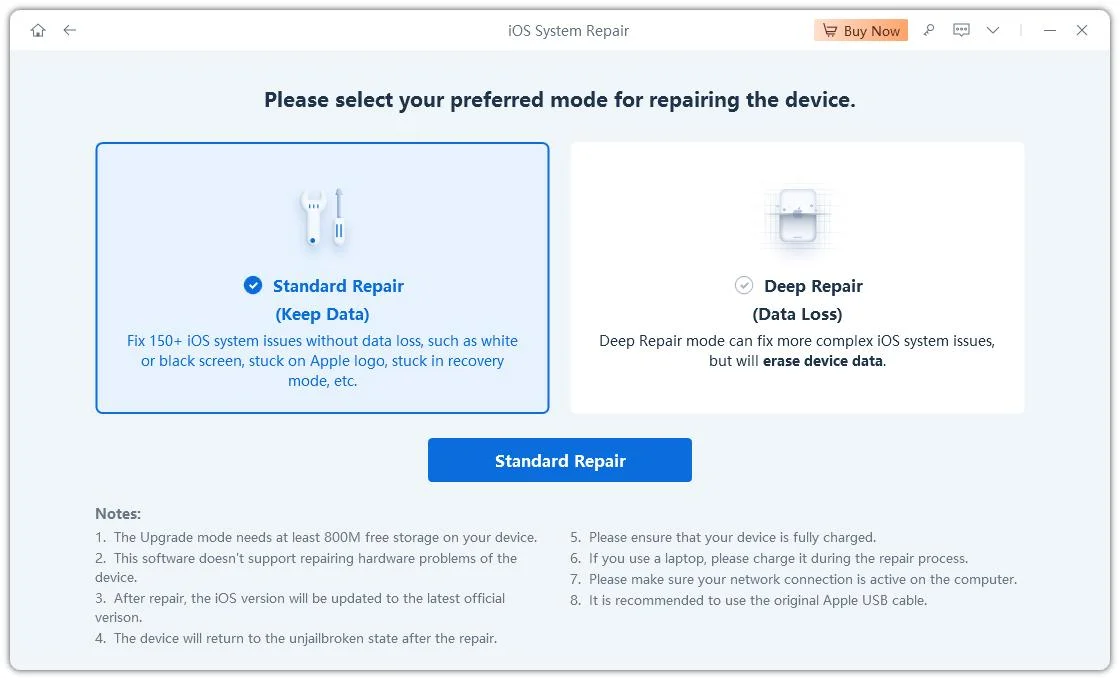
- Step 3: Choose “Standard Repair”
Click Download to get the latest firmware for your iPhone model.
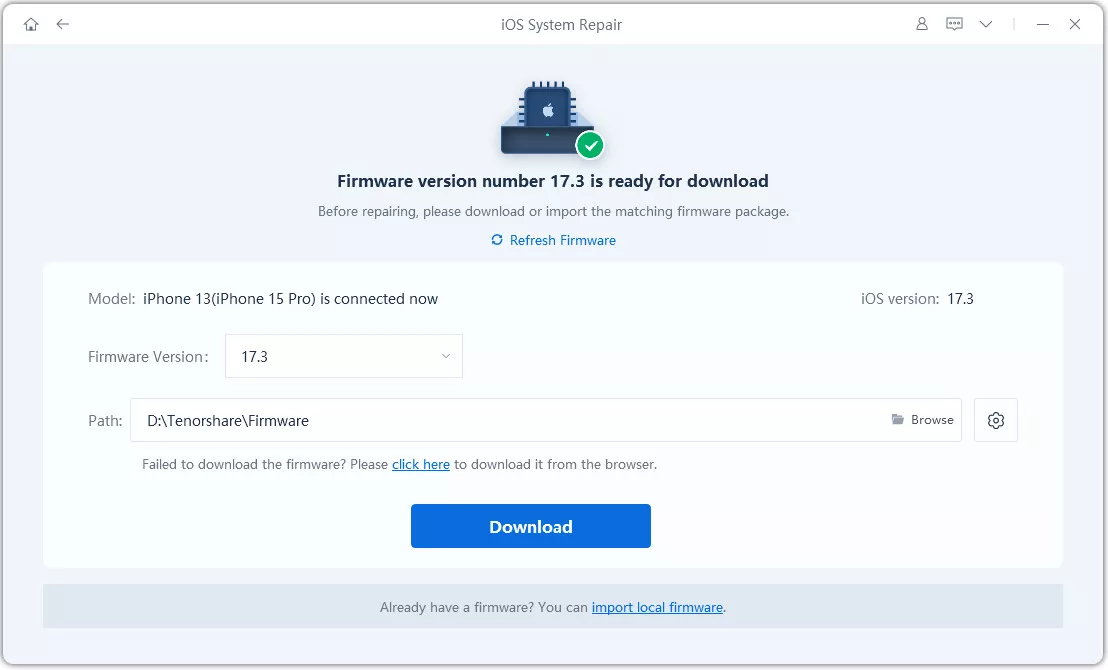
- Step 4: Download the Firmware
After the download completes, select Start Standard Repair to begin fixing.
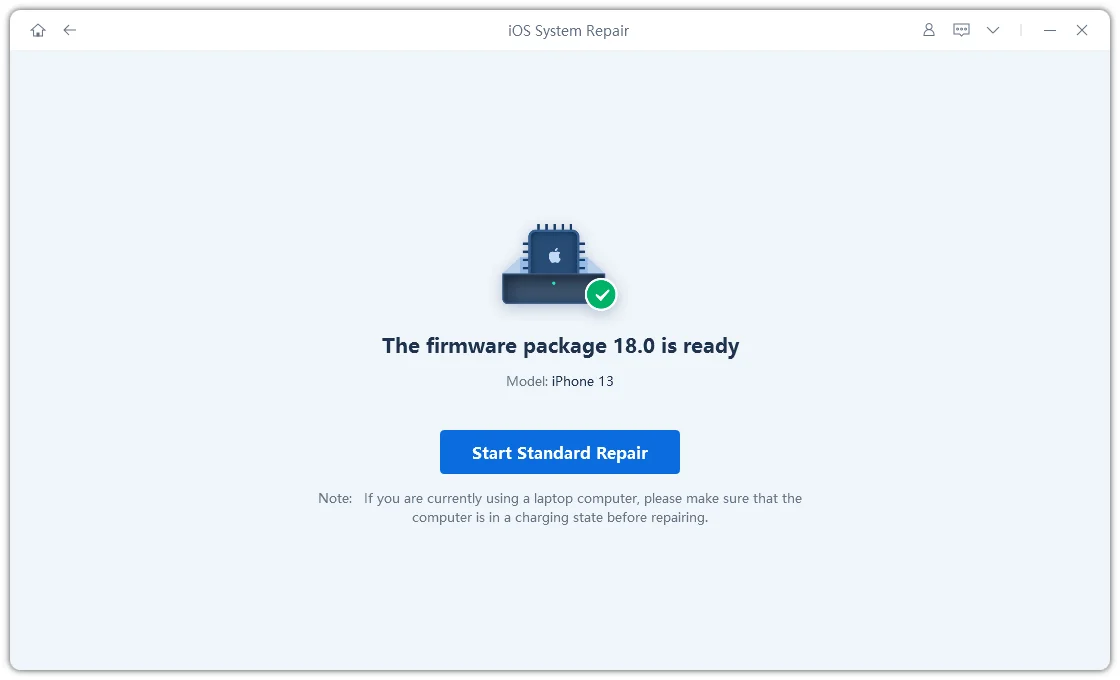
- Step 5: Begin the Update
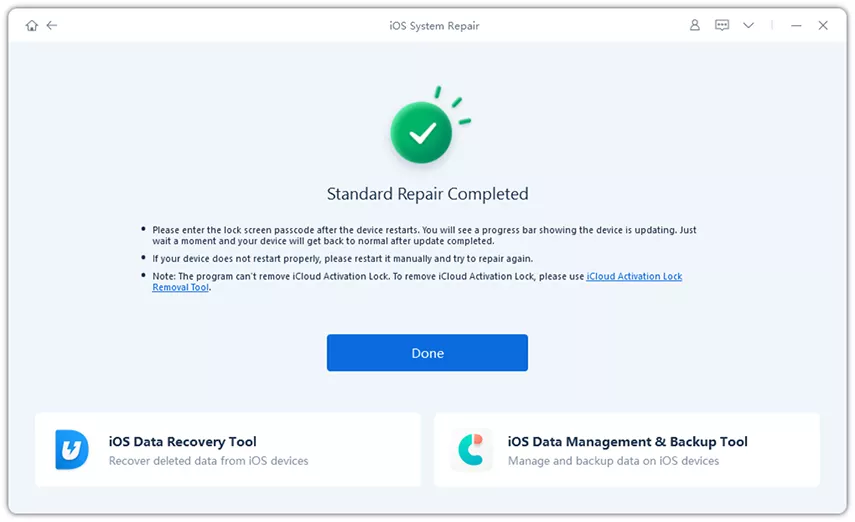
Wait for the process to finish. Once done, your iPhone will restart automatically and return to normal.
Method 2: Fix iPhone Won’t Restore Issue via iTunes or Finder [Data Loss Warning]
When your iPhone is stuck on the restore screen, iTunes or Finder can usually fix it by restoring the device. However, this process erases all data, so it’s best to back up your iPhone if possible.
Also, make sure iTunes or Finder is updated; outdated versions can cause connection issues.
Steps how to fix iphone stuck in restore mode and won't restore:
Step 1: Connect your iPhone to your computer using a USB cable and open iTunes or Finder.
Step 2: If iTunes doesn’t detect your iPhone, try force restarting your device (use the steps mentioned in Method 1).
Step 3: Once detected in “Recovery Mode,” a pop-up will appear asking if you want to “Restore” or “Update” your iPhone.
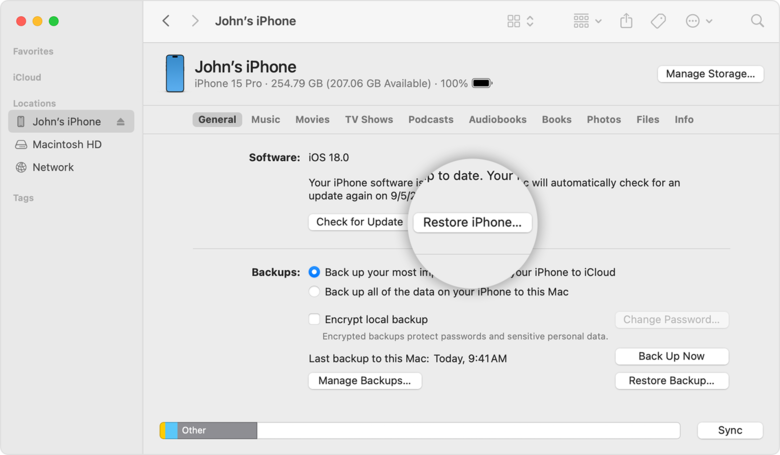
Step 4: Click Restore. iTunes will download the latest iOS software and restore your iPhone to factory settings.
Step 5: After the process, you can set up your iPhone as new or restore it from a previous backup.
Method 3: Exit iPhone Stuck in Restore Mode Loop with DFU Mode [Wipe All Data]
DFU mode provides a deeper system restore option than standard recovery. It reinstalls both firmware and iOS, helping to fix devices that remain unresponsive or stuck on the restore screen. The process wipes all data and settings, making it a full reset method for serious software failures.
Steps to fix iphone won't restore Using DFU Mode
Step 1: Plug your iPhone into your computer and open iTunes or Finder. Make sure your connection is stable.
Step 2: Enter DFU Mode based on your iPhone model:
iPhone 8 or later: Press and quickly release Volume Up, then Volume Down. Hold the Side button until the screen goes black. Keep holding Side + Volume Down together for 5 seconds, then release Side but continue holding Volume Down until iTunes or Finder detects the device.
iPhone 7 or 7 Plus: Hold Side + Volume Down for around 8 seconds. Let go of the Side button but keep holding Volume Down until detected.
iPhone 6s or earlier: Hold Home + Power for about 8 seconds. Release Power but keep holding Home until the device is recognized.

Step 3: Once iTunes or Finder confirms your iPhone is in DFU mode, a message will appear saying it needs to be restored.
Step 4: Click Restore iPhone to begin. Wait for the process to complete and your device will restart with a fresh iOS installation.
FAQs About iPhone Stuck in Restore Mode
1. What do I do if my iPhone is stuck in restore mode?
First, try restarting your iPhone by pressing the right button combination for your model. If that doesn’t work, connect it to your computer and use iTunes or Finder to restore it. To avoid data loss, you can also use a repair tool like Tenorshare ReiBoot to exit restore mode safely with one click.
2. How do I fix my iPhone restore error?
Update iTunes or Finder to the latest version then, try restoring again. If the restore keeps failing, use ReiBoot’s Standard Repair to fix system glitches without erasing your data.
Final Words:
You’ve now learned several ways to fix an iPhone stuck in restore mode from force restarting and updating iTunes to using DFU mode or restoring via Finder. While these methods can help, they often risk data loss or take extra effort. For a quicker and safer solution, Tenorshare ReiBoot is worth a try. It repairs restore mode issues in just one click without erasing your data, making the whole process effortless.