
Updated on 2026-05-21 / iPhone Tips
Apple Intelligence is a new system feature in Apple devices that uses on-device AI to improve suggestions, writing tools, and smart features. However, it can take several GB of storage on your Mac, which may slow down performance or reduce free space.
Many users look for ways on how to delete Apple Intelligence on Mac quickly and safely. In this guide, you will learn simple and clear steps to disable or remove Apple Intelligence and manage your device storage more efficiently.
Part 1: What Is Apple Intelligence and Why It Uses Storage on Mac?
Apple Intelligence is Apple's built-in AI feature in newer macOS versions. It helps you with writing, summaries, Siri, and other smart tools on your Mac. These features work on your device, so macOS downloads and saves AI files in your storage. Over time, these files can take up space and reduce free storage. That is why many users search for how to delete Apple Intelligence on Mac to free up space and keep their system running smoothly.
Why Apple Intelligence uses storage on Mac:
-
Downloads AI models for on-device processing
-
Enables features like writing tools, summaries, and smart suggestions
-
Improves Siri and system-level intelligence functions
-
Stores language and learning data locally for faster response
-
Keeps system assets cached even when features are not actively used
Part 2: How Much Storage Does Apple Intelligence Use on Mac?
Apple Intelligence storage is not the same on every Mac. It depends on your macOS version and which features you are using.
On most Macs, it uses around 7 GB of space, but in some cases it can go up to 8--10 GB or more if more AI features or language tools are active.
You can check it here:
Apple Menu > System Settings > General > Storage > macOS

In storage details, Apple Intelligence appears under system data or macOS files. Even after turning it off, the space may not free up immediately because macOS sometimes keeps these files for a while.
Part 3: How to Delete Apple Intelligence on Mac to Free Up Space
Many users notice that Apple Intelligence takes around 7GB or more of storage on Mac, and sometimes it appears without clear notice after a macOS update. If you are not using it, you may want to turn it off to free up space. Apple does not offer a full "delete" option, but you can disable it and let macOS remove or reduce its data over time.
Here is how to delete Apple Intelligence on Mac to free up space:
-
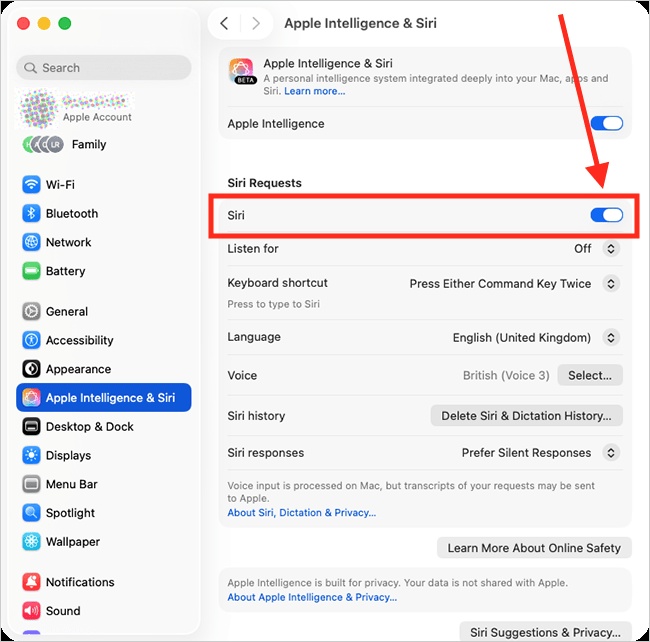
Step 1: Open System Settings
Click the Apple menu () in the top-left corner of your screen. Select System Settings from the dropdown menu.
-
Step 2: Go to Apple Intelligence Settings
In the left sidebar, scroll and click Apple Intelligence & Siri. This is where all AI-related controls are managed.
-
Step 3: Turn Off Apple Intelligence
Find the Apple Intelligence toggle. Switch it OFF. A confirmation box will appear asking if you are sure. Click Turn Off Apple Intelligence to confirm.
-
Step 4: Restart Your Mac
Restart your Mac after turning it off. This helps stop background AI processes. It also helps macOS start cleaning unused system data.
-
Step 5: Check Storage
Go to System Settings > General > Storage. Wait for the storage breakdown to load. Look under System Data / macOS files to see Apple Intelligence usage.

-
Step 6: Wait for Automatic Cleanup
macOS may not delete AI files immediately. It can take 24--48 hours for the system to remove unused models. During this time, storage may gradually reduce on its own.
Part 4: How to Turn Off Individual Apple Intelligence Features (Without Full Removal)
You don't always need to remove Apple Intelligence completely to save storage or reduce its impact. Apple allows you to control some features separately, so you can keep useful tools while disabling the ones you don't need. This is helpful if you only want to reduce activity instead of fully learning how to disable Apple Intelligence Mac system-wide.
Method 1: Turn Off Apple Intelligence Features in Apps
Some Apple Intelligence tools are linked to specific apps like Messages, Mail, and Notes. You can turn them off individually from app settings.
Steps how to remove Apple Intelligence from iPhone:
-
Open Settings (or System Settings on Mac)
-
Go to Apps
-
Select the app (for example, Messages or Mail)
-
Look for Apple Intelligence or smart features
-
Turn off options like Summarize Messages or smart suggestions
-
Repeat for other apps you want to limit
Method 2: Disable Writing Tools and Smart Text Features
Writing Tools are one of the most active Apple Intelligence features. They appear when you select text in almost any app.
Steps remove apple Intelligence storage writing usage:
-
Open System Settings
-
Go to Apple Intelligence & Siri
-
Find Writing Tools or text intelligence options (if available)

-
Turn off system-wide writing assistance
-
Test by selecting text in Notes or Mail
Bonus Tip: One-Click Repair Tool to Fix iOS Problems Caused by System Data
Even after turning off Apple Intelligence or clearing storage, your iPhone or iPad may still slow down or show wrong storage. This usually happens due to hidden system errors.
You can also use Tenorshare ReiBoot to fix these issues easily. It repairs iOS system errors without deleting your data. The tool can fix slow performance, storage glitches, and other hidden problems in a few clicks. It also refreshes your device system safely and improves overall speed. It's a simple option when manual fixes don't work.
Key Features:
-
Fixes iOS system errors without data loss
-
Repairs stuck Apple logo and boot loop issues
-
Solves storage and system data glitches
-
Improves slow performance and lag issues
-
Supports iPhone, iPad, and iPod touch
-
One-click system repair option
-
Safe and user-friendly interface
Final Words
Apple Intelligence can take up several GB of space on your Mac, which is why many users search for how to delete Apple Intelligence on Mac to free up storage. You cannot fully remove it, but you can turn it off and let macOS slowly clear the unused files. If your device is still slow or showing storage issues, you can try Tenorshare ReiBoot. It can fix system problems safely without deleting your data and helps your device work smoothly again with simple steps.